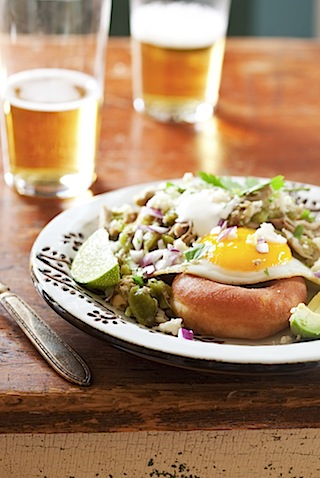
Archive for the ‘Savory’ Category

Cooking with Gas


Monday, June 16th, 2008

Last week, I got the range of my dreams. I’ve been pining away for a commercialesque gas range now for about as long as I can remember. Some people dream about their wedding dress or owning a fancy car. I dream about cooking with gas. I have pretty much always made do with a simple electric range… there was that one span in college when the apartment came with a old, white enamel gas stove from the 50s which put out about as much heat as a few votive candles huddled together for warmth. I’ve managed to cook up some pretty amazing stuff with the electrics too. But always there was a longing for something industrial and packed with BTUs. In April, we had natural gas run to the house. We were just doing the furnace (which like many older Seattle homes was still running on oil). The stove would have to wait. Then, work picked up, and suddenly Cam and I decided, hey… let’s just bite the bullet and get the stove. At long last, my stove was coming home.

 Mg 1279-9

Of course, nothing is all that simple. To begin with, I had to figure out what stove I wanted. It became pretty clear to me pretty quickly that the Viking I had been envisioning was not a great choice. Although fit and finishwise, they are gorgeous machines, even a little bit of digging and you’ll soon see that they tend to be ultra prone with problems. That research lead me to Wolf and DCS, which subsequently lead me to a company called Bluestar. Although not available (at least at the moment) in the dual-fuel version I was hoping for, everyone who had a Bluestar was in love. To start with, they are one of the least expensive high-end ranges you can get, and have the most powerful cooktop, with a blazing 22,000 BTUs. I was pretty sold, until I went and looked at one that is. Cool and industrial, definitely… but the fit and finish started to scare me. The oven didn’t feel like it closed quite tightly enough and had some sharp edges. The open burners intimidated me as I thought of my panache for boiling over. While in the store, we stumbled across the American Ranges. These ranges have a similar price point to the Bluestars, but have closed burners with an easy to clean stainless top, and the oven is the largest in its class… easily able to fit full sized commercial baking pans. The edges were smooth all around, and while the burners weren’t quite the same as the Bluestars’, 17,000 BTU seemed like plenty for me (and about the same as the Wolf, DCS and Vikings). We went home to do more research, happily finding that American Range owners are nearly as religious about their stoves as the Bluestar owners. We were sold.

To get the stove in with the necessary duct work required some semi-serious kitchen demolition that included very large holes in the ceiling, cabinets, and eventually brick work. Amazingly, thanks mostly to Cam, it all came together, and after just over a week with chaotic kitchen construction, I ended up with one kick-ass stove and some killer ventilation to boot. Of course, before I got a chance to use it, we left town.

 Mg 1248-9 Mg 1257-18

But, finally, I’ve fired up the gas and started searing away. While my first meal on it wasn’t so much a great test (pasta and sauce on top with a zucchini gratin baking in the oven), tonight’s dinner was made for this stove. At the Pike Place market, I picked up four enormous sea scallops to sear. Just a little smoked sea salt, aleppo pepper and olive oil, one really hot frying pan and enough patience to let each side sear before touching them (this is always the hardest part). Topped with a little mango and green garlic salsa… yum.

 Mg 1268-2

Seared Scallops with Mango and Green Garlic Salsa

The Salsa
1 mango, 1/4 inch dice
1/2 cucumber, seeds removed, 1/4 dice
3 garlic spears, roughly chopped
1 lime
olive oil
aleppo pepper
salt

Mix the mango, cucumber and chopped garlic together. Squeeze the lime juice on top, add a splash of olive oil and stir to coat. Add a pinch of aleppo pepper and salt to taste. Cover and refrigerate for least 5 minutes.

The Scallops
4 large sea scallops
smoked sea salt
aleppo pepper
olive oil

Rinse the scallops and pat dry. Sprinkle with the salt and aleppo pepper and drizzle with olive oil.

Heat a heavy-bottom skillet over medium heat for about 2-minutes. Add enough oil to lightly coat the bottom of the pan and heat. Add the scallops to the pan leaving plenty of room between each one. Cook on one side for 2 to 3 minutes without moving them. Then, flip them over, and cook on the other side until browned. Remove the scallops from the pan and let them rest for a few minutes before serving.

Top each scallop with a healthy spoonful of the salsa.

Chile Lime Pistachios


Monday, May 5th, 2008

My poor dog-earred food magazines. All those little folded over corners which continue to suffer from neglect. This month, I must have marked at least 40 some recipes. Including one in the May 2008 Gourmet for Chile Peanuts. I don’t even like peanuts. But, I fell in lust with the photo, and I love the combination of chile and lime. Enter the bag of pistachios that have been sitting on the counter, getting slowly nibbled away.

Do you like pistachios as much as I do? The addictive process of popping them out of their shells. I’ll just shell 10 more, I think, only to find myself a few minutes later repeating the same thing, just 10 more. I give the thin brownish purple skins a little pinch to expose the green nut meat. It’s good that I enjoy the shelling process because I seem to eat almost as many as I’m going to need. For this recipe, I ended up with a healthy cup full… but who knows how many ended up in my belly along the way.

20080505 2532-224520080505 2535-2248
20080505 2536-224920080505 2542-2255

I think that this chile lime mixture would work well with almost any nuts… but I love the bright green color with the red spices from the paprika and chile. And the lime tang really wakes up the sweetness in the pistachios. These are the perfect little addictive snack to munch on if you are enjoying a little Cinco de Mayo cocktail as well.

Chile Lime Pistachios

If your pistachios are already salted, cut back on the amount of salt you use in this recipe or leave it out entirely and salt to taste after the nuts are roasted.

1/2 fresh lime
1/2 T olive oil
1 t paprika (not hot)
1/2 t cayenne pepper
1 t salt
1 cup shelled pistachios

Preheat oven to 250°F.

Whisk together lime juice, oil, paprika, salt, and cayenne. Stir in pistachios to coat evenly.

Line a baking sheet with parchment. Spread the nuts over the parchment paper. Roast on the middle rack for about 30 minutes or until the spice mixture has dried on the nuts.

Your kitchen should smell pretty heavenly as these are roasting. The nuts will get more crispy as they cool, but good luck keeping fingers out of them.

Zhatar’s Herby Deliciousness


Wednesday, April 16th, 2008

A few weeks ago, I picked up a little book that I have come to adore, A Handful Of Herbs. It’s tiny and really only has a handful of recipes and gardening tips… but the recipes are good, the tips are fun, and the photos, of course, are gorgeous. I have come to love to leaf through its mere 120 some-odd pages. The first recipe that caught my eye was one for something called zhatar. It is a Persian spice mixture that I had never heard of that mixes thyme with sesame seeds and salt to make a dry rub that is often sprinkled on hard boiled eggs. It sounded intriguing, and I made a little note to myself to come back an try it. Imagine my surprise when a project that I am working on for a client (the thing that has kept me so busy, I haven’t had a chance to blog) included a recipe that included zhatar!

The recipe for zhatar (sometimes zaatar, sometimes za’atar) seems to vary by region, but usually includes the combination of thyme and sesame with ground sumac. The dish that I was preparing for my client also introduced ground pistachios into the mix. Yum! It may not be traditional, but I highly recommend it. I also like throwing some red chile flakes into the mix for a little kick.

20080416 2348-206120080416 2342-2055
20080416 2343-205620080416 2334-2047

You can use the zhatar on eggs, like I did with these poached eggs over hashed fingerling potatoes. But, it’s also fantastic on yogurt with a little lemon and olive oil mixed in, or sprinkled on top of hummus.

By the way, I received a fantastic treat in the mail today! The first issue of Edible Seattle. This is a magazine that I’d be excited about regardless, but it is all the more fun because it is packed with my photos (including the cover shot!) and an article I wrote last fall on Maria Hines of Tilth. The magazine should start showing up on shelves soon!

200804161833In The Kitchen Maria Hines0078

Lara’s Zhatar
I’m foregoing spoon measurements here… just add the ingredients in about equal parts.

1 part pistachios
1 part thyme leaves, fresh or dried
1 part turkish oregano (optional)
1 part sesame seeds
1 part red chile flakes (optional)
salt to taste

Grind the pistachios in a spice grinder until you have course crumbs. Mix with the remaining ingredients. Sprinkle on stuff.

This mixture should keep for at least 1 week in a sealed plastic bag.

Sustainable Yellowtail: A Beautiful Thing


Friday, March 21st, 2008

One of the best parts of my job is that I tend to get a lot of free food. Even food that I winds up on the set is still edible when I’m done. Oh, I wouldn’t go feeding it to guests or anything… afterall, it is usually cold and always has been poked and prodded by my fingers. But, it’s also made from the highest quality of ingredients I can find, and is (almost) always, delicious.

Most of the time, this free food is simply left over from a shoot that I’m doing. Sometimes, it’s sent to me by companies that are looking for feedback, really excited about sharing their product with someone who thinks a lot about food, or someone who is simply looking for extra press. I certainly understand that there are some bloggers out there who prefer not to accept free stuff… but I’m not one of them. When I get free stuff, I never promise to write about it on this blog. It takes something pretty special, in fact, to make it on here. And, sometimes, I still don’t even get around to it. But, sometimes, like today, I do.

Today, I want to share with you a fish that I am really excited about. When I got mail from Hannah asking if I’d be interested in trying some Kona Kampachi from Kona Blue, I was intrigued. I’m a huge fan of sushi, and will always have a hard time turning away from sashimi-grade yellowtail. But, what really struck me is that Kona Blue is a company trying new methods of fish farming that attempt to solve some of the problems of related to traditional “aquaculture.” In-shore fish farm can create serious pollution problems, releasing waste and excess nutrients into water at rates that can’t be cleaned up by natural processes. Those farmed fish also tend to suffer from mercury poisoning. Kona Blue is fishing in large sea-cages sunk into deep water far off shore, so the fish can basically school as they would in the wild and the pollution problems can be avoided. And, at the same time, the natural fish population is not being depleted. The fish also boast a 30 percent fat content, high levels of omega-3 fatty acids, and no detectable mercury.

I think it’s really early to tell whether these new fish farming practices are a good thing or if they introduce problems of their own. But, I applaud companies for trying to solve some of these problems in a responsible way. Plus, I can tell you this, the fish is beautiful.

Konakomapchi-9Konakomapchi-10

My package arrived well packed in ice, but not frozen, so the two, large fillets were immediately ready to use. The fillets are thick and fatty… perfect for a nice lunch of sashimi, with a ton still left over.

Konakomapchi-2Konakomapchi-4
Konakomapchi-7Konakomapchi-5

In fact I’ve been playing with a variety of preparations… the fish is so fresh, it’s almost a crime to cook it… but in addition to a sashimi miso salad, some simple nigiri sushi, I also lightly seared a good chunk and served it with a butternut squash mash and a fresh lemon dressing. Yum. I still have a whole fillet left that will have to be put to use quite soon. In the meantime, I thought I’d share a few shots and recipes with you.

If you want to try to find some of this fish on your own, you can order it from their website… but shipping is quite expensive. If you are in Seattle, Uwajimaya sometimes has it in stock and several area restaurants, like Canlis and Oceanaire have it on their menu. Or you can check out Kona Blue’s extensive “where to find” list.

PS: Thanks to Matt for correcting my initial mis-statement that Yellowtail is Tuna. In fact, it is its very own fish. All these years of ordering hamachi, and I always thought I was eating tuna!!!

Konakomapchi-6

Seared Yellowtail in Lemon Dressing
From Arabesque by Claudia Roden

I went searching through about 15 different cookbooks to find this super simple seared tuna recipe. Most of the other recipes I found piled on enough seasonings that the flavor of the fish would be lost. This yellowtail was far to lovely to cover up. What loved about the Arabesque recipe was how delicate the dressing is… it brightens and enriches the flavors already in the fish. I substituted hazelnut oil in the dressing, which I thought brought even a new dimension to the flavor. The original recipe also recommended pairing the seared fish with mashed potatoes, but I had some left over roasted butternut squash that I smashed up with a little OJ and a little cream which went beautifully with the citrus sauce on the fish. A little mache salad on the side brings a little more springtime to the plate.

1 lemon
2 T hazelnut oil
salt & pepper
1 thinly chopped green onion (or fresh chives)
2 T olive oil
1 thick-cut fillet of sashimi grade yellowtail (or tuna)

Zest and juice the lemon into a small bowl. Add the hazelnut oil, green onion and freshly cracked pepper. Set aside.

Heat the olive oil in a pan on high heat. Just before the smoking point, add the fish. Sear for only 1 minute on each side. Remove from heat. Slice into thin slices and sprinkle with sea salt flakes. Pour the dressing over the top to serve.

Konakomapchi-1

Yellowtail Sashimi in Miso Dressing
From Harumi’s Japanese Home Cooking

Here’s another lovely recipe from Harumi’s Japanese Home Cooking. This is so simple, but does require the best fish you can find, with a good amount of fat on it. The fat helps give a wonderful silky mouthfeel, not to mention a richer taste. You’ll need a few ingredients that you’ll probably have to go to an Asian market to get. Red miso paste and mirin can be hard to find in some supermarkets.

1/3 lb sashimi-quality yellowtail (or tuna)
3 T red miso paste
1 1/2 T casters (super-fine) sugar
1/2 T mirin
1 t rice vinegar
1/8 t dry mustard
1 1/2 c chopped green onion or chives
1 T finely grated ginger

Mix together the miso, suar, mirin, vinegar and mustard, until smooth and the sugar has dissolved.

Cut the fish into little cubes, about 1/2 to 1 inch each, and place in a medium sized bowl. Start adding the dressing a little at a time, stirring gently, until each piece is nicely coated. You may not need to use all the dressing… and I think it is best not to add too much dressing or you won’t taste the fish.

To serve, place in individual bowls, and top each with the green onion and a little dollop of freshly grated ginger.

Salmon Noodle Soup for What Ails You


Wednesday, March 5th, 2008

I don’t know about where you are, but everywhere I turn, someone is getting sick. I, knock on wood, have managed to avoid it so far but my poor not-so-little one has gotten some kind of fever inspiring crud twice now in the last month. I’m still not sure how I’ve avoided it… it must be all that lard.

Anyway, if you or someone you love is caught up with the aches and pains, you might try making this simple Salmon Noodle Soup for them. Or, even if everyone is feeling just fine, it’s a lovely spring kind of soup. Unlike most salmon soups which can be heavy with cream or Asian inspired, this soup is a simpler, lighter broth. Like chicken noodle soup, except a bit fishier. It’s super quick to make from scratch, even if you are making starting from the stock.

20080304 0816-526-120080304 0797-507

For the stock, see if you can find frozen fish scraps at your local fish shop. If you are in Seattle, head up to Central Market for a great selection of left over fish parts (or chicken, beef or pork for that matter) that are great for soups and will only set you back about a buck fifty. For my stock, I used onion, celery, thyme, garlic, peppercorns and a teensy bit of fresh ginger. I also threw in dried bonito flakes, as you would for dashi, although my fish stock remained very European tasting. You can of course, use any veggie and seasonings you like. Parsnips, fennel, parsley, carrots all make lovely additions. You don’t even need to chop them. Just throw them in the pot.

20080304 0809-51920080304 0810-520

To make the stock, add your defrosted and rinsed fish parts, herbs and veggies to a large stockpot and add a good glug of olive oil and about 1/2 cup white wine. Heat on low for about 5 or 10 minutes until it gets nice and fragrant. Then, cover it all with water and simmer for 30 minutes. I like to strain the resulting broth through a couple of layers of cheese cloth to remove any left over bits, but any fine strainer will do. For this recipe, you’ll need about 4 cups of stock. The rest can be refrigerated or frozen for later use.

20080304 0802-512

Salmon Noodle Soup

4 cups fish stock
2 carrots, small-dice
1 stalk of celery, small-dice
2-3 new potatoes, small-dice
1-2 fresh salmon fillets
3 scallions, chopped into small rounds
2 cups of pasta, cooked but not sauced
1 tablespoon fresh tarragon, chopped
olive oil
Salt and pepper

Heat the fish stock in a large soup pot.

In a medium skillet on medium-high, heat the olive oil and add the chopped carrots, celery and potatoes. Saute until the vegetables start to soften, about 3 minutes. Add a ladle of stock and cook for another minute as some of the stock is absorbed. Then, dump the whole concoction back into the rest of the broth, and bring to a simmer. Cook for 7-8 minutes.

Meanwhile, wipe out the skillet and heat it up again on medium-high heat. Brush the salmon fillets with a bit of olive oil, and place flat (skin) sides up in the hot skillet. Cook for 2 minutes. Then, flip the fillets over and cook for another 3-4 minutes. Remove the fillets from the pan and remove the skin. Break the salmon into bite sized pieces. It’s ok if it’s still a bit rare in the middle… it will cook more in the broth.

Add the salmon, scallions, tarragon and pasta to the broth. Add salt and pepper to taste, and simmer for another 5 minutes. Serve up as is, or for a little more indulgence, a small pat of butter.


More Piadina Please


Thursday, February 21st, 2008

A few years ago, if you had asked me what my favorite restaurant in Seattle was, I could have answered without hesitation. This is pretty unusual for me… I’m not one that easily compares things. I don’t have top 5 favorite albums or foods or movies. There are things I like, and things I don’t like, but putting them in order just seems beyond me. There are too many factors to weigh in… my mood, what I’ve been doing lately, who I’m with. So, it was odd that Osteria La Spiga always seemed to strike me as my favorite.

La Spiga was a tiny little, rustic in a kitschy sort of way, place tucked into the corner of shops along the south end of Broadway just before the “pill hill” where almost all of the hospitals in Seattle are situated. Service was always a little hit or miss, but the food, traditional Emilia-Romagna fare, was stunning. Handmade pastas with the perfect tenderness to make me swoon, slow-cooked meats which were fall off the bone tender, an affatatti misti plate with whisper thin proscuitto and other delights. But the one thing that drew me back over and over was the flat bread. Piadina is like a thick, tender flour tortilla, but with more flavor and bite. The little cut triangles of the warm bread are a perfect match for the prosciutto or cheese, or, even better, stuffed with goodies like fresh mozzarella, basil, wild mushrooms and truffle oil, and called a Crescione which in my mind translates to “food of the gods.” I could eat the flat bread, just plain and simple, piece after piece after piece if no one were around to stop me.

Piandina-9Piandina-22

A couple of years ago, La Spiga moved from its funky and charming location to a new space that is about as different as is possible. Where the old location was always quite cramped, the new restaurant soars with double height ceilings and huge wooden beams, and at least 5 times the seating. The old place had a faux old world feel, while the new is warmly modern. The old location usually had one waitress or waiter for the whole room, where the new location seems to have staff winding their way around tables everywhere you look. It’s just as crowded as ever, but now there are pleasant places to wait instead of having to loom over the other diners. It’s truly a beautiful work of architecture.

The one thing, luckily, that hasn’t changed is the food. The menu may have grown along with the space, but my taglietelle ragu is as good as ever and I’d be hard pressed to find anyone that didn’t coo over the Filetto al Tartufo, butter knife tender filet drizzled with truffle oil. And then, there is the piadina. Yes, it’s still there and as good as ever.

These days though, when asked what my favorite restaurant in Seattle is, I hesitate. I still love La Spiga. I love the new space, the prompter service and the gorgeous food. But, still, I miss the old spot. I loved how its funky space and slowish service made you step back, slow down and stop worrying about what you were going to do next. You were going to sit there and eat your meal whenever it happened to arrive. And, with food like that, that was always enough. Especially when you could always ask for “a little more piadina please”.

 Mg 7958Piandina-10-1

All of that is a very long way of saying that after years and years, I finally got around to making piadina at home. Traditionally, piadina is made with lard, and as you know, I just happen to have a whole lot of lard right now. I’m sure you could substitute vegetable shortening, but I think you’d miss out on some of the flavor and tenderness of the flat bread. I’ve also seen recipes that substitute olive oil, although this would likely make a bigger change in the texture of the dough.

I ended up using a recipe from Food & Wine which was exceedingly simple to make. So simple, in fact, that I have been kicking myself for not making it sooner. The F&W recipe called for baking soda, although many of the recipes I’ve seen don’t add any type of levening. Next time around, I plan on either leaving it out, substituting baking powder or just using less, because I thought that the flatbread had a tiny bit of a bitter after-taste from the soda.

 Mg 7918 Mg 7926

Regardless, the dough, after sitting, takes on this wonderfully smooth texture that is soft and easy to roll out to a nice thin round. Piadina should really be cooked on something like a pizza stone, but I don’t have one. A stove top griddle, however, works too, although getting the temperature right can be a little tricky. Near the end, my griddle was a little too hot in spots and I quickly scorched a few breads. Luckily, I still had plenty already cooked up for a nice lunch and nibble throughout the day.

Piandina-15

Piadina
recipe from Food & Wine

Tradition has it that you must not make piadina when the south-westerly wind blows… the warm, damp wind makes the dough too soft. So, best to save your piadina making days for the dry season.

Makes 6 rounds

3 1/2 c all-purpose flour
1/2 t baking soda
Kosher salt
4 oz lard or vegetable shortening, at room temperature
3/4 c water
1 T olive oil, plus more for brushing

Combine the flour, baking soda and salt in the bowl of a stand mixer (or in a large bowl if you want to knead it by hand) and mix together with a fork. Cut the lard into 1 inch pieces and using a pastry knife cut the lard into the flour. You can just use the mixer for this, but I found it didn’t do a great job of mixing in the lard and the pastry knife was just easier.

Next, start to add the water, just a little bit at a time, and mix on the stand mixer with a dough hook on lowish speed until the dough starts to form into a ball. Increase the speed to medium, and let it knead until smooth, about 5 minutes.

Remove the bowl from the mixer and cover with a damp towel. Let the dough sit for 30 minutes at room temperature.

Preheat the oven to 225F. Heat the griddle on medium-high to quite hot.

Divide the dough into 6 pieces, and roll each piece out to 10 inch rounds. The discs should be about 1/8 inch thick. Lightly brush the bread on both sides with olive oil.

Place one or two rounds on the griddle (depending on the size of your griddle) and cook for about 2 minutes on each side, or until you see the little brown spots that mark when it’s done. Wrap in foil and place in the oven while the next round goes into the griddle. The piadina are best eaten warm, the day they are cooked.

Tasty Veggie Dips


Friday, February 1st, 2008

It’s not like you really need another dip recipe. Not only are there old standbys, but there are some really gorgeous looking alternatives out there this week. So these two recipes, variations on a couple of heavenly looking dips in Marie Claire Seasonal Kitchen, are really overkill. But, they are so good, I hope you try them anyway.

Edibles Renee-10520080201 0248-252
20080201 0255-259

First off, I give you carrot dip. Now, I was lucky enough to make mine from carrots that were pulled from the ground yesterday. Can you imagine? In January, you can still harvest carrots. And these were true beauties. Big, thick brilliantly orange sticks that smelled like earth and sunshine. Just washing off the caked mud was enough to make me swoon. And, when I saw the beet dip recipe, with its deep scarlet color, I knew that I could get gorgeous results with carrots instead. A bit of reduced blood orange juice (you can use any oranges or even meyer lemons if you want) makes the dip all the more vibrant, both in flavor and color.

20080130 0151-15220080201 0253-257

I smeared my dip on little polenta-garbanzo bean flour blinis, which I adapted from a recipe that I shot for this Epicurious article last fall (the panna cotta recipe is lovely by the way). But, this dip would work equally well with pita, crackers, celery or a nice crusty french loaf.

20080201 0262-26620080201 0259-263

I hadn’t actually meant to make two dips, but sitting right next to Seasonal Kitchen’s beet dip recipe was an Italian white bean dip that I couldn’t resist. My version replaces the white beans with black eyed peas, adds a bit of meyer lemon and leaves out the tuna for a veg friendly dip. A drizzle of truffle oil or a good salad-quality oil and a sprinkle of basil easily pushes this dip into the favorite category and a nice change from the usual. Again, crackers or crusty Italian bread would be lovely, but I just made some little toast triangles from bread I had at home.

20080201 0263-267
Carrot Dip
Makes one good sized bowl full.

3 large carrots
4 cardamom pods
1 bay leaf
1 blood orange
1 t sugar
4 T plain yogurt
salt and pepper to taste

Preheat the oven to 400F (200C).

Peel the carrots and slice into 1 inch chunks. Place them in a baking dish and fill about 1/2 way up with water. Add the cardamom pods and bay leaf. Cover with foil, and bake for about an hour or until the carrots are very soft. Remove the carrots from the baking dish and let them cool.

Mix the juice from the orange with the sugar in a small sauce pan and heat over medium-high until the liquid reduces by about half. Let cool.

In a food processor, blend the carrots until they are smooth, adding a bit of the reduced orange juice if it gets to thick. Transfer the carrot puree to a bowl and add the yogurt and remaining reduced orange juice. Stir to just combine. Season to taste with sea salt and black pepper.


Polenta-Garbanzo Bean Blinis
Makes 25-30

1/4 cup garbanzo bean (chick pea) flour
1/4 cup polenta corn meal
1/8 t baking powder
1 t salt
1 egg, lightly beaten
1/4 cup yogurt
1/4 cup skim milk

In a medium sized bowl, mix together the garbanzo bean flour, polenta, baking powder and salt. Add the egg and stir to combine until all the flour is moistened. Add the yogurt and milk. Let the mixture sit for 15 minutes.

Heat a griddle to medium heat and lightly brush with olive oil. Drop small spoonfuls (a bit smaller than 2 inches across) of batter onto the griddle. Let them cook until you start to see small bubbles bursting throughout and the edges just start to pull away. If the griddle is to hot the blini’s will rise more in the middle and get a bit weird looking so reduce the heat. You don’t want them to rise too quickly. Flip and cook on the other side for about the same amount of time. Let them cool on a baking sheet (it’s best not to stack them when they are hot).

20080201 0261-265
Meyer Lemon and Black Eyed Pea Dip
Makes one good sized bowl full.

Note: You need to start this recipe the night before you want to serve it, or use canned black eyed peas.

1 cup dried black eyed peas
1/2 cup vegetable stock
2 T olive oil
1 Meyer lemon
1/4 cup fresh basil leaves, julienned
salt and pepper to taste
oil for drizzling

Place the dried peas in a bowl and cover with water. Let sit over night.

Drain and rinse the peas and place in a heavy bottom sauce pan. Add the vegetable stock, cover and cook on low for about 1 hour until the peas are quite soft and have lost any of the mealy texture. Remove from the heat and let them cool.

Put the softened peas into a food processor with the olive oil, and juice from the lemon. Blend just a little until the oil has been incorporated and the peas have broken down a little. Don’t blend too much though, you don’t want a paste.

Place the puree in a bowl and stir in the basil leaves. Salt and pepper to taste. Drizzle with your choice of oils.

Savory Cream Scones with Cheese and Bacon


Saturday, January 26th, 2008

I’m not sure what this says about us, but we received large packages of bacon this year from not one, but two different people. I mean big packages of bacon. Our freezer is brimming with bacon. Thick cut, apple wood smoked; peppered; Canadian-style. Come on over, and have some bacon… we have plenty to share!

Not that I’m complaining. I mean, what doesn’t go better with a bit of bacon in it? We quickly nibbled up two packages crisply grilled. Yum.

Brunch Picnic-3-1Brunch Picnic-2-1

Yesterday, I pulled out the Macrina Bakery sweet scone recipe and made a couple of changes to make a savory version of cheesy bacon scones. These scones, with their generous heaping of whipped cream, bake up extremely light. But don’t let their innocent looks fool you… they are energy (ie, calorie) power houses. Bacon, cream and cheese all in one. They are little triangles of indulgence and a perfect way to work on that beer gut or heart attack you’ve been looking for. Or maybe a good reason to go shopping for some new, less constrictive clothing. Oh, the joys of eternal optimism.

Brunch Picnic-8-1

Bacon and Cheese Cream Scones
(adapted from the Macrina Bakery Cookbook, p 62)
Makes 10 to 12 scones

4-6 slices of bacon
1 cup sharp white cheddar, grated
1/2 c parmesan-reggiano, grated
3 1/2 cups all-purpose flour
2 T sugar
2 T baking powder (yes, Tablespoons!)
1 t salt
2 1/2 c heavy cream
1 egg

Preheat oven to 350F. Line a baking sheet with parchment.

Fry up your bacon until it is quite crisp. Drain on a paper towel lined plate, and set aside.

Combine the two cheeses in a bowl and toss with a fork to get them well mixed.

Sift the flour, sugar, baking powder and salt together in a medium to large bowl. Crumble the now cooled bacon into the flour mixture and stir to coat. Add the cheese, and mix well.

Beat the cream with a whisk or mixer until you get medium soft peaks. Fold half of the cream into the flour mixture, mixing carefully. Try to get all of the flour off the bottom of the bowl. Then, mix in the other half of the whipped cream and fold in very gently. You don’t want to over mix the dough.

Lightly flour a work surface, and carefully pour the mixture out onto the surface. The dough will probably still be a bit wet, with dry bits of flour here and there. Flour your hands, and carefully shape the dough into a 1 inch thick rectangle. Then, fold the dough in half over itself and flip it over. It should start to become somewhat moldable. If it seems too wet still, sprinkle a touch of flour on the top and shape and fold again. However, don’t do this too many times or you’ll kill the advantage of whipping your cream first. Once it will basically hold together, form a 3×16 rectangle about an inch or so thick. Cut the rectangle into triangles (about 10 to 12).

Lift scones and place onto the parchment very close together. They should almost be touching, but not quite… maybe 1/4 or 1/8 of an inch between. This will help them keep their shape.

Make a quick egg wash of a beaten egg and about 1 t of water. Then, lightly brush the scones with the mixture. A tiny bit of smoked salt sprinkled on top would be a nice addition at this point.

Bake for 25 minutes or until golden brown. Scones should cool for about 10 minutes on a wire rack.

Udon with no Shoes On


Friday, January 18th, 2008

Before the holidays, I was browsing in the bookstore that is attached to Uwajamiya, one of Seattle’s large Asian food grocery stores. I was there to find some manga as a present for my daughter, but of course, immediately got sucked into the cookbook section, completely tempted by book after book that I had never seen before. Never mind that they were written in kanji, so I had no hope of reading any of them…. the photos were enough to keep me mesmerized until realizing the time, I had to rush on over to get the books I was supposed to be buying.

Afterward, one set of books stuck with me… those by Harumi Kurihara. The Japanese versions of these books are graphically gorgeous, light, airy and elegant. I knew I’d have to find the English version. Luckily, there are two… not quite in the same light style, but still beautifully published. Last week, I picked up Harumi’s Japanese Home Cooking and flipping through I knew I had a winner of a book. Many of my favorite Japanese dishes… tonkatsu, gyoza, tomago are beautifully illustrated. Finding the recipe for homemade udon noodles, however, was the real kicker.

Udon2002Udon2004
Udon2006Udon2016

Even better, these noodles are about the most fun thing to make (not to mention incredibly simple). I thought I’d be able to use my new toy… the pasta attachment for my Kitchen Aid…but as it turns out, these slippery, thick noodles really don’t require anything other than a bit of arm strength and some time. In fact, I highly recommend against using the dough hook attachment on the Kitchen Aid for the initial kneading… I gave it a try, and found that it couldn’t get the dough to form into a ball well enough when my hands could. Once the dough was in a ball, it was far too heavy and stiff for the mixer to knead it properly. That said, it’s also too hard to knead it with your hands at that point… so Harumi has a wonderful solution. Use your whole body… by wrapping the dough in a plastic and then a towel, you walk all over it to help work the gluten in the dough. Brilliant! It’s so much fun. If you have kids, you must give this a try. Or, even if you don’t.

Udon-000007Udon-000033
Udon-000034Udon-000024

I found the noodles this recipe makes to be more on the rustic side… more like handshaven noodles than packaged udon. That’s part of what makes them good… but if you prefer a more even, refined noodle, and you have a pasta maker, try using the roller to press out the dough before hand cutting the noodles.

Udon2014


Udon

1 cup lukewarm water
5 t salt
3 1/2 c bread flour
1 1/2 c all-purpose flour

Dissolve the salt in about 1 T of the water, then add the rest of the water. Set aside.

In a very large bowl that you’ll be able to knead the dough in, combine the two flours with a fork. Make a little well in the center, and add the salted water. Use the fork to pull a little bit of flour into the liquid, and then start to use your hands to work the moistened flour into the rest of the flour. Depending on the moisture content of your flour, you might need to add a bit more water… as the dough comes together, it should form into a lumpy ball. If it stays as too ragged, sprinkle a bit more water on and work it in.

Start seriously kneading the dough as hard as you can for about 10 minutes, on a board dusted with bread flour. If the dough is too sticky, knead in a touch more of the bread flour. To knead, fold over from the top, and use the heal of your palm to press it flat again. Turn the dough 45 degrees and repeat.

Now comes the fun part. Wrap the dough in a heavy duty plastic bag. I like to use left over produce bags.. but they are thin so I double wrapped to be safe. Then, wrap the the plastic bag in a largish kitchen towel. Set it on the ground and stand on it. Move around, do a little dance, hop up and down, take a stroll. Your whole body weight on the dough will work it like your hands never could. This helps make the noodles good and chewy. After a few minutes, take the dough out of the bags… it will be pretty flat, but with a rolling pin, roll out any irregularities. Then give it a fold, put it back in the bag, wrap it in the towel and walk on it some more. Repeat this process about 4 times. Then, leaving the dough in the bag, let it rest for 3 hours in a warm place.

After it’s had a chance to rest, take the dough out and form it into a ball. Place it back in the bag & towel and walk on it one more time… this time making a point to try to spread the dough as much as possible. The thinner you can get it by walking on it, the easier the rest of the process will be.

Take the dough out from the bag again, and roll it out on a floured surface until it is a square about 1/8 inch thick. The dough may be pretty stiff and springy, so this may be a bit challenging. If you can’t seem to get it thin enough with a rolling pin or if you want a more refined udon, cut it into 4 pieces and run it through the thickest setting of a pasta machine, and give them a good dusting of flour.

Next, fold the dough from the top to the center and then from the center to the bottom (like an accordian). Then, with one of the long edges facing you, slice off the dough in 1/8 inch pieces. Dust the sliced pieces with a bit more flour as you go to prevent them from sticking.

Boil the noodles immediately, or cover with a towel while you are waiting for the water to come to a boil. The noodles will need to boil for about 7 minutes, stirred with a chopstick to prevent them form sticking together.

Traditionally, the noodles are served hot, with a dashi-based stock. But, they are also delicious stir fried with a splash of sesame oil, oyster sauce, soy, sesame seeds and some veggies or meat of your choice.

Cheater’s Puff Pastry Pinwheels


Saturday, December 29th, 2007

How can you not love a recipe that starts with this dough is magical? And, in fact it is. This rugelach dough that I found in Kate Zukerman’s The Sweet Life will fool you into thinking that you spent hours bookfolding dough to achieve it’s tender puffy layers… only you will know differently. It’s almost ridiculously easy. The toughest part is having to wait several hours for the dough to chill. But, then it’s just a quick roll and a bake to little pinwheels of soft, tangy goodness.

RugalechRugalech (6)
Rugalech (2)
Rugalech (5)Rugalech (1)

The first time I tried this dough, I stuck with just a slight variation to Zukerman’s original Walnut and Cinnamon Rugelach recipe, only substituting orange zest in place of the currents in the sweet filling. I’d make these again in a heart beat… but what I also found was that the dough was so light and mild, it would work equally well with savory fillings. So, I reworked a batch, with 1/2 the sugar, and rolled up one log with salmon and cream cheese and another with a simple pesto. It worked brilliantly, perfect for little party appetizers. You can play endlessly with combinations to use with this “magical” dough.

Rugalech (4)

Cheater’s Puff Pastry Pinwheels

The original recipe for this dough used cream cheese, but I substituted in quark, which has even more of a pleasantly sour flavor. If you do use quark, pour off any standing liquid first. If you are filling the pastry with sweet stuff, increase the sugar to 1 t.

4 oz butter, at room temperature
4 oz cream cheese or quark, at room temperature
1 cup flour
1/4 t salt
1/2 t sugar

Sift together the flour, salt and sugar. Set aside.

Cream the butter and soft cheese together on medium until it is light and fluffy. Reduce the speed to low and slowly add the dry ingredients, beating until well combined. Increase the speed to medium, and beat for about 15 seconds.

Scrape the dough onto plastic wrap and press into a flat disk. Then, double rap the dough and refrigerate overnight.

To use, roll out the dough on a lightly floured surface into a large rectangle about 12 x 16 inches. Then, cut into two 6 x 16 pieces. Fill as desired with the long side facing you, and roll up. Wrap the dough in wrap again and chill for 30 minutes. Or, if you want, you can freeze the log to use later in the week.

To cook, slice the log into 1-inch cross sections, and place each little round about 1 inch apart on a parchment lined baking sheet. Bake at 350F for about 15 minutes, or until the dough is a light golden brown. Allow the pinwheels to cool for about 15 minutes before serving. They will keep up to 4 days, depending on your filling.

Technorati Tags: ,